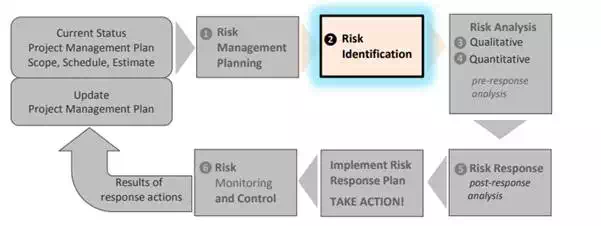
Risk Identification Throughout Project Development
Risk identification occurs throughout each phase of project development:
1. Planning
2. Scoping
3. Design/Plans, Specifications, and Estimate (Engineer’s Estimate)
4. Construction
As projects evolve through project development, the risk profile evolves and understanding grows. Therefore, previously identified risks may change and new risks may be identified throughout the life of the project.
Risk Identification: Inputs, Tools and Techniques, Outputs
Risk Identification Inputs
The first and most important input is a defined project. In order to fully understand and assess the risks that our projects are exposed to, we must first ensure there is a mutual understanding of the project under evaluation. This means that in order to focus on the risks and uncertainties our project will face, we must first define the project in terms of context, scope, schedule, and estimate, commensurate with the level of project development at the time of risk analysis. Progressive elaboration should not be confused with scope creep. (Source: Project Management Book of Knowledge)
Projects tend to develop in small steps. This incremental process of project development is sometimes termed “progressive elaboration.” Progressive elaboration means developing in steps, and continuing by increments. For example, the project scope will be broadly described early in the project and made more explicit and detailed as the project team develops a better and more complete understanding of the objectives and deliverables.
Risk Identification Tools and Techniques
The project team, sometimes in collaboration with cost risk experts and subject matter experts, identify as many risks as possible that may affect project objectives (Exhibit 2-1). State the assumptions for risk identification and analysis, and delineate thresholds for risks. For example, a project team may want to describe risks with impacts below $100,000 or less than two weeks as minor. By doing so, we do not spend excessive amounts of time on risks that do not significantly impact our ability to meet project objectives. Focus must be directed toward risks that can significantly impact the project. Assumptions and thresholds for risk assessment are project-specific and are influenced by the size and complexity of the project and project environment, and the owners’ tolerance for risk. There are a wide variety of techniques used for risk identification. Some common techniques used at WSDOT are provided below.
Documentation Reviews
Peer-level reviews of project documentation, studies, reports, preliminary plans, estimates, and schedules are a common and early method to help identify risks that may affect project objectives.
Information Gathering
· Brainstorming – Formal and informal brainstorming sessions with project team members, specialty groups, stakeholders, and regulatory agency representatives is a technique for risk identification. This technique can be scaled for use on the simplest to the most complex projects. This technique can also be tailored to specific areas of interest for the project risk; for example, if a Project Manager is most concerned about geotech conditions, a brainstorming session on geotech can be convened.
· Lessons Learned Database – Searching for lessons learned using key words in the WSDOT Lessons Learned Database that are relevant to your project can provide an abundance of information on projects that may have faced similar risks.
· Other Methods – Other techniques include: questionnaires and surveys; interviews, checklists, and examination of the work breakdown structure for the project with appropriate specialty groups; and asking “what if” questions (for example, “what if we miss the fish window?” or “what if our environmental documentation is challenged and we have to prepare an EIS?”).
Risk Identification Outputs
An expected deliverable from risk identification includes a preliminary “risk register,”1 which documents the following information:
Identification # for each risk identified – Assign a unique number to each risk for tracking purposes. If available, do this by utilizing an established Risk Breakdown Structure (RBS); the WSDOT RBS is provided in Exhibit 2-4.
Date and phase of project development when risk was identified – Document the date the risk was identified and in which project development phase (planning, scoping, design/PS&E, construction).
Name of risk (does the risk pose a threat or present an opportunity?) – Ensure each identified risk has an appropriate name; for example, “NEPA Delay” or “Reduction in Condemnation.” Also, document the nature of the risk with respect to project objectives (threat or opportunity; you can do this by using the RBS for naming conventions.
Detailed description of risk event – The detailed description of the identified risk must provide information that is Specific, Measurable, Attributable (a cause is indicated), Relevant, and Time-bound (SMART). Ensure the description is clear enough and thorough enough so that others reading about the description of the risk will understand what it means.
Risk trigger – Each identified risk must include the risk trigger(s). Risks rarely just suddenly occur; usually there is some warning of imminent threat or opportunity. Clearly describe and document these warning signs and information about the risk. For example, “NEPA Approval Date” may be considered a risk trigger on a project that has a risk of a legal challenge.
Risk type – Does the identified risk affect project schedule, cost, or both?
Potential responses to identified risk – Document, if known, possible response actions to the identified risk—can the identified threat be avoided, transferred, or mitigated, or is it to be accepted? Can the identified opportunity be exploited, shared, or enhanced?
Comments about risk identification – Risk management is an iterative process, so regularly review project risks. As you identify new risks, document and assess them. Consider the resulting risk register preliminary only until the completion of additional and appropriate activities.