Why You Need a Risk Tracking Template
Every project has risk. If you’re don’t think so, then you’re fooling yourself and are in for a nasty surprise. The sharp project manager is going to understand that while risk is inevitable, the ability to forecast it and prepare a strategy to correct whatever wrongs may occur during the project is part of what planning for a project is.
But it’s not enough to simply do the due diligence and prepare, you have to be prepared to deal with that risk, whatever it may be, when it occurs. One thing that is crucial is to have a mechanism in place to track risk throughout your project’s lifecycle. If you at first don’t identify it, that’s a problem, but once you see it, if you don’t track it, well, that’s a tragedy.
Therefore, you need to systematically track and evaluate the performance of the actions you take to mitigate risk against established metrics throughout the acquisition process while developing other options. This is where a risk tracking template comes in handy. It provides you with all the places to collect the needed data to follow that risk and see how your actions to remedy it are working.
With our free Excel template you can download and create a vital document in your project management arsenal. It has everything you need in one place, and we offer it to you free because as a project management software company, we understand that a project is only as good as the tools you have at hand to complete it successfully, on time and within your allotted budget.
Here you’ll be able to identify the risk, note where it might start to impact the project and even tag the person who identified it. There’s also space for you to determine how likely the risk will in fact impact the project, estimate that risk and then better identify it if and when it occurs.
Other things a risk tracking template helps with are providing a space to fully describe the risk and how it might impact the project, as well as assigning an owner to that risk. This is the person who is responsible for monitoring the risk and implementing action to mitigate it. That way the risk is less likely to be ignored, instead of everyone thinking everyone else is taking care of it.
You also have a way to say when the risk is no longer a risk; that is you can close it. Once the risk is not impacting the project and has been taken care of, you don’t want to waste valuable resources tracking it. Here is where you can also describe the reason for closing the risk, which is a great way to communicate with your team and stakeholders.
How to Use a Risk Tracking Template
It’s important to prepare for risk, and when it happens, have a plan to resolve it. But you also need a method of tracking that risk to keep an eye on it. Now that you’ve downloaded the free Excel spreadsheet, and you’ve hopefully read this far, you know why it’s a great document to have at your disposal. Now, how do you use it?
Let’s go step by step. It’s not a very difficult process, but like all processes, you need to be thorough because if you miss even what appears to be a minor point, you might throw the whole procedure off. Then it’s not going to help anyone.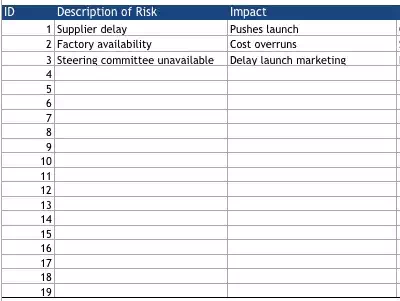
1. ID, Description of Risk and Impact
Begin by giving each risk a number, so you can start a list and not confuse one from another. Just consider this an identification for shorthand, which is why it goes under the column heading for ID. Next to that is the column for where you can put the description of this potential risk. Be thorough in outlining what you think it is, but you’re not writing a book. Just put down what’s essential. The rest is by definition unnecessary. You’ll also want to be succinct in the next column when you sketch out the various impacts such a risk might have on your project. But be sure to include everything. If you don’t know what this risk can impact, then you can’t develop a strategy to deal with it if and when it arises.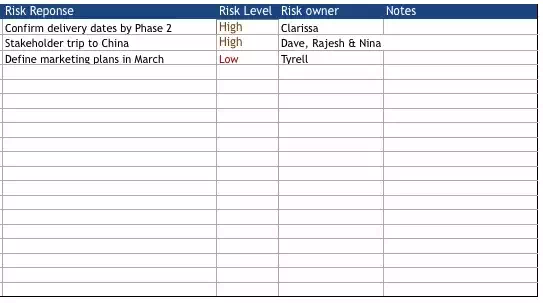
2. How to Respond to Risk, What’s the Priority and Who Owns It
Now comes the hard work, filling in the risk response column. Don’t slack off on this part; it’s the engine in your vehicle to drive out risk from your project. Again, this isn’t a novel you’re writing, but a short and decisive response to the risk if it rises its head during your project. Now the next column is where you prioritize. This is where you make a decision as to the level of the risk. It may be high, medium or low, and you need to mark which here. That way you can filter the spreadsheet to see how much of each level of risk you have, and then prioritize on how you will eventually deal with them.
The next step is assigning an owner to that risk. As noted earlier, if you don’t have someone on the team who is responsible for identifying that risk and being the one who will initiate a quick and strategic response to it, then you risk having that risk becoming a bigger problem as it grows unnoticed. Finally, don’t forget the notes column. This is where you can jot down thoughts that don’t fit into any of the previous categories. It’s always helpful to have a place to get those ideas down or else they’ll fall between the cracks.
How to Import a Risk Tracking Template
When you’re using ProjectManager.com as your project management software, then importing a risk tracking template is easy. Start on the homepage and then click the drop-down menu on the upper left-hand side. From there you can scroll down to import and the sub-section of risk.
Once you’ve clicked on that a window pops up asking you to select the file you want to import. It accepts both Excel spreadsheets and CSV files. There are some required columns, such as for the project name, and if you haven’t filled these in you’ll be given an opportunity to do so before importing. Then it’s as simple as clicking the import button and you’re done.
How to Use a Risk Tracking Template in ProjectManager.com
1. List and Share
With ProjectManager.com you have a special section in which to list all the risks of a particular project, marked clearly, with status and level of priority. Best of all, you can share it with the relevant team member with just a keystroke.
2. Easy to Edit
Once you’ve selected a specific risk, you have a simple and quick way to edit everything about that risk, from its name and description to who raised it and who it’s assigned to. Plus, you can add whatever files are relevant to the risk.